Tile adhesive, also known as tile mortar or tile setting mortar, is a crucial component in the installation of tiles, providing a strong and durable bond between the tiles and the substrate. This versatile material comes in various forms, catering to diverse tile types, substrates, and application requirements.
Description: The most common type, composed of cement, sand, and additives, offering good strength, water resistance, and versatility for various tile types and substrates.
Benefits:
Drawbacks:
Study proposal : click here for more information about roof thermal insulation and Clamp and tile leveling wedge .
Description: A two-part adhesive consisting of a resin component and a hardener, offering exceptional strength, water resistance, and chemical resistance.
Benefits:
Drawbacks:
Description: A modified cement-based adhesive containing latex additives, offering improved flexibility, workability, and adhesion to various substrates.
Benefits:
Drawbacks:
Description: A single-component adhesive based on acrylic or styrene-butadiene rubber (SBR) polymers, offering excellent adhesion, flexibility, and ease of use.
Benefits:
Drawbacks:

Choosing the appropriate tile adhesive depends on several factors, including:
Tile Type: Consider the weight, size, and material of the tiles.
Substrate Type: Assess the surface characteristics and absorbency of the substrate.
Application Requirements: Evaluate the exposure to moisture, temperature fluctuations, and potential movement.
Personal Preference: Consider factors like ease of use, working time, and cleanup requirements.
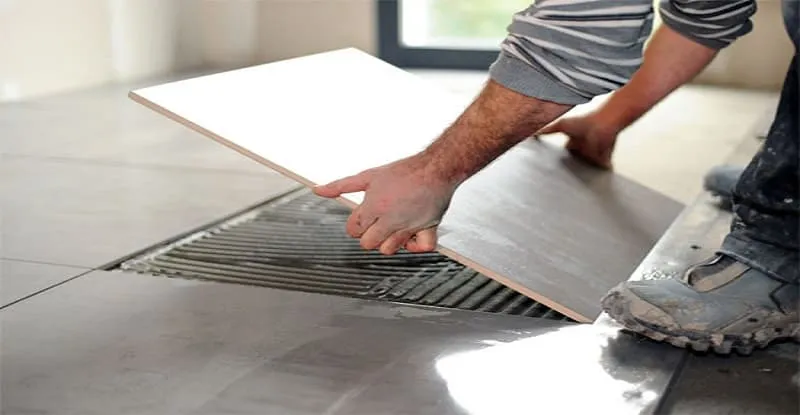
Ensure the substrate is clean, dry, and free of loose debris or contaminants.
Follow the manufacturer’s instructions for mixing the adhesive, ensuring proper consistency.
Apply the adhesive evenly using a notched trowel, matching the notch size to the tile size.
Set the tiles firmly into the adhesive, ensuring proper spacing and alignment.
Allow the adhesive to cure completely according to the manufacturer’s recommendations.
Once the adhesive is cured, apply grout to fill joints and enhance the aesthetics and water resistance of the tiled surface.
Dear consumers, this question is usually asked whether powder tile glue is better or tile paste glue, which should be decided according to the location of the tile, the size of the tile, and the type of tile. Each square meter has a pasty glue and it has a longer shelf life if it is kept in powder form in its packaging, and it is suitable for both walls and floors, but it needs to be mixed with water if the pasty glue is ready to use and for gluing tiles. For the ease of work, craftsmen prefer to use tile paste on the old wall tiles, except for the above-mentioned items, it should be taken into account that the amount of paste glue used is less than that of powder glue for the same size.
The main material used for the production of tile adhesive is inorganic polymer portland cement with stone, modified chemicals based on cement, polymer, silica stone, synthetic resin, and also chemicals that strengthen the strength of adhesion. The use of these materials in the manufacture of glue causes positive and implantable features in it.
Tiling over existing tiles may be considered a shortcut, but it can be a practical option for those wanting a functional kitchen or bathroom redesign. There are several important points to consider before starting your project.
The existing tiles must be well attached to the walls. If the old tiles come off the wall and fall off, so will the new tiles, so make sure the old tiles are properly secured.
One way to check is to gently tap them. If it feels too hollow, it’s probably not connected well. Pay special attention to wet areas where problems are more likely to occur.
Existing tiles must be clean and free of grease or other contaminants that can affect the adhesion of the adhesive used for new tiles. Use sugar soap or suitable degreaser to clean the surface before tiling.
One thing to consider is aesthetics. Tile on tile can be noticeable around the perimeter of the room such as cladding, door frames, shower fittings and especially if only half of the room is tiled. This is unlikely to be a problem, unless you have chosen to finish the top with a tile trim, you cannot place the trim behind the original tiles, so it may leave an unsightly finish.
Before tiling, determine the main substrate. Most substrates such as gypsum and plasterboard have a weight limit per square meter. Fat-free plasterboard can only withstand about 20 kg/m2.
If you have a rough white tile (20×25) with adhesive and grout, you will have a weight of about 14 kg/m2 on your bathroom wall. With this in mind, you will only be allowed 3kg/m2 for tiles after adhesive and grout, which may cause structural failure if exceeded.
This will limit your choices for new tiles. If you’re looking to use larger, heavier tiles, you’ll probably need to remove the old tiles first.
When tiling over existing wall tiles, it is important to consider the adhesive you are using as only certain tile adhesives are suitable for tile over tile.

Wear protective gear: Use gloves, safety glasses, and a mask to protect yourself from dust and irritants.
Work in a well-ventilated area: Ensure adequate ventilation to minimize exposure to fumes or chemicals.
Clean up spills promptly: Use damp cloths or sponges to clean up spills while the adhesive is still fresh.
